Clipping against a Window
Clipping and Windowing.
Copyright (c) Susan Laflin. August 1999.
When you draw a diagram on a piece of paper, you automatically position and scale it so that the drawing remains on the paper. Similarly if you are drawing an object interactively on the screen of a terminal, you will not move the cursor off the screen and so your resulting drawing will be wholly visible. However, the majority of pictures generated in computer graphics do not have these visual checks on the size and position of the resulting output. Usually the coordinates will themselves be the result of lengthy calculations, and it is difficult if not impossible to predict the size of the resulting numbers. Some graphics devices cause the program to crash if you try to access a point outside the permitted area, while others detect this and merely present you with a blank drawing. In either case you will wish to avoid this problem.
In place of the piece of paper, you need to specify a window in world coordinates. This means that only x values between xmin and xmax and only y values between ymin and ymax will be plotted. Because these values are specified by the program in the world coordinates in which the problem is defined, the software can test them and if necessary shift the output to ensure that it is visible. To clip the drawing against this window, you could include extra tests within the DDA algorithm to check each pixel and only illuminate those which lie inside the window. This requires an additional four tests for every pixel and makes the whole process very slow. A little thought makes it clear that this amount of work is quite unnecessary when you are dealing with straight line segments and a rectangular window. If both end points of the line lie within the window, then both mathematics and common sense tell you that the whole line lies within the window and so it should be drawn without any further tests.
Lines which are wholly or partly outside the window require a little more work, and you will need to refer to the figure below to consider this. First consider the y values of the two end points. If both values are less than ymin, then the whole line lies below the window and the entire line is invisible and should not be drawn. Similarly if both are greater than ymax, then the whole line lies above the window and should not be drawn.
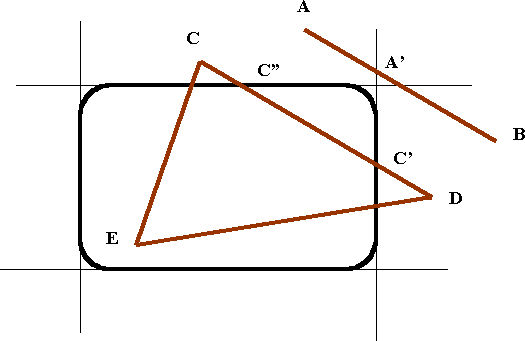
Clipping against a Window
Lines with both x values less than xmin lie to the left of the window while those with both values greater than xmax lie to the right of it. In neither of these cases should the lines be drawn. Once these tests have been applied, you will usually find that large sections of the drawing have now been dealt with and you are left with the comparatively small number of lines, such as AB and CD in the figure, which require further processing. At this stage it is not possible to distinguish between AB which is wholly invisible and CD which has a small visible segment.
To process these lines and draw the visible segments, you must calculate the intersection of each edge of the window in turn with those of the remaining lines which cross it. Consider the edge x=xmax and the points A', C' and D' where it intersects the lines AB, CD and DE. AB is now split into the two segments AA' whose y values are both greater than ymax and A'B whose x values are both greater than xmax. Hence you can now see that it consists of two segments, which are both invisible for different reasons. CD is now split into CC' which requires further processing and C'D which is invisible. DE is now split into the invisible segment DD' and the visible one D'E. A final comparison with the edge y=ymax now splits CC' into the invisible segment CC'' and the visible one C''C' and this picture is complete.
There are a number of ways in which these ideas can be implemented. The text by Angell associates parameters IX and IY with each end point and then applies tests to IX and IY which are equivalent to the discussion above. The text by Newman and Sproull is probably designed for low-level programming since it assigns bit patterns to each end point and applies logical operations to them. If x is less than xmin, the first 2 bits are set to 10, if x lies between xmin and xmax then they are set to 00 and of x is greater than xmax, then they are set to 01. The second 2 bits are set according to the value of in the same way. They may then be tested as follows:
If the logical OR of the codes for the two end points is zero, then the codes must both be 0000 and so the line is wholly on the screen. If the logical AND of the codes for the two end points is non-zero, then the line is wholly off the screen and should not be drawn. Otherwise it must be clipped and tested again.
These methods give fast, correct results for diagrams and drawings made up of many individual lines. However when we are dealing with an area such as the interior of a polygon, a slightly different approach is needed.
Polygon Clipping.
If the polygon lies entirely inside the window in world coordinates, then there is no problem. However there are many cases when some or all of the polygon protrudes beyond the window and then care is needed in order to clip it in a manner suitable for shading.
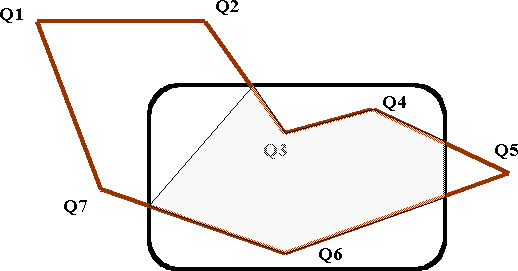
Incorrect Polygon Clipping
Using the previous algorithm for line-clipping, it might seem reasonable to clip each side of the polygon in turn against the window, resulting in the example shown in the figure below. These points could then be joined up in order to give the clipped polygon. This would include the dotted line, which is certainly not part of the original polygon and shading this would fail to fill an area in the top left hand corner of the screen. So this method is satisfactary to produce those linear segments of the polygon sides which lie on the screen, but is not suitable to produce the area of intersection of polygon and screen.
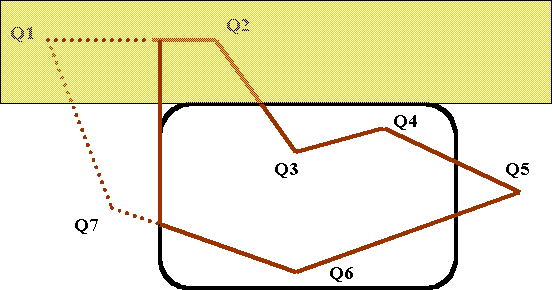
It is possible to check whether a corner of the screen lies between two intersection points and inside the polygon and insert this in the array for the new perimeter of the clipped polygon, but it is usually neater and more efficient to use the `Sutherland-Hodgeman Algorithm', described below. In this case, instead of clipping each side of the polygon in turn against the rectangular window, the algorithm is applied four times and each time the sides of the polygon are clipped against one edge of the window. The next figure shows the first application of this where the polygon used in the previous figure is clipped against the edge e1 (x=xmin).Those parts of the polygon on the shaded side of e1 are outside the window and therefore invisible while those on the other side are visible and must be retained.

Clipping against edge e1
The algorithm can be described as follows:

Set Q{1}=Q{n+1}
	For j=1 to 4
	For i=2 to n+1
	If Q{i-1} and Q{i} are on opposite sides of ej
		then calculate point of intersection
			and insert it between Q{i-1} and Q{i}
			increase n by 1.
		else do nothing
	If Q{i} is visible
		then retain it
		else reject it, move all points
			and reduce n by 1.
	Repeat
	Repeat
End
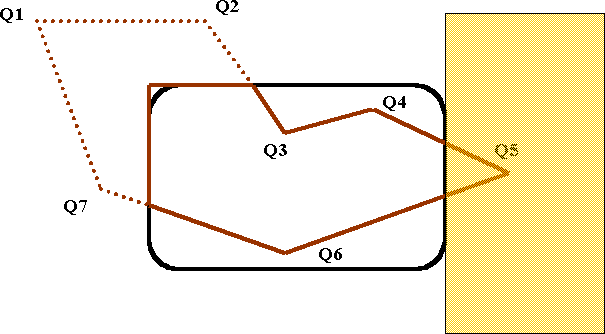
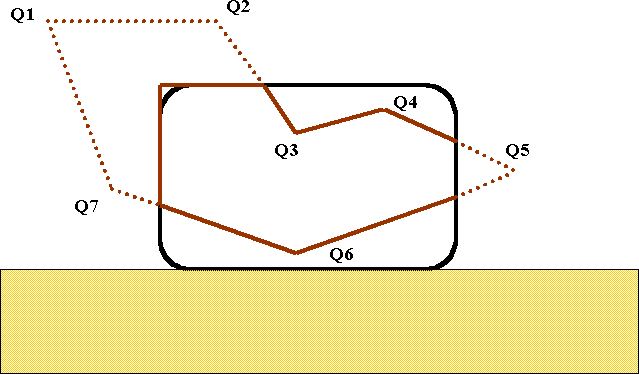
In the above figure, for j=1 you have the situation where Q1 is replaced by a new vertex, Q2 to Q6 are visible and unchanged and Q7 is replaced by a new vertex. In this case, the number of vertices remains the same.
Clipping against edge e2
The next figure shows the situation when j=2, corresponding to the edge e2 (y = ymax). Here Q1 and Q2 are replaced by new vertices, one of which is the corner of the window. The remaining vertices are unchanged.
Clipping against edge e3
When j=3, the clipping is against edge e3. In this case, Q5 has to be replaced by two new vertices, thus increasing the total number of vertices by one.
Clipping against edge e4
The final case when j=4 does not have any effect in this particular case. You should also supply some extra examples for yourselves and work through them to ensure that you have the correct idea.