Three-dimensional Drawings.
Copyright (c) Susan Laflin. August 1999.
When a three-dimensional object is represented by a two-dimensional drawing, various techniques may be used to indicate depth. We shall think initially of wire-frame drawings, but many of the same ideas can apply to shaded drawings of solid objects.
1. Intensity Cues.
The points or lines closer to the viewpoint appear brighter if drawn on the screen and are drawn with thicker lines when output to the plotter. A shaded drawing on the screen can adjust the intensity, pixel by pixel, giving a result similar to a grey-scale photograph.
2. Hidden-line and hidden-surface removal.
Hidden lines may be removed or indicated with dotted lines, thus leading to an easier understanding of the shape. Several algorithms for this problem will be discussed in the appropriate section , as it is of great importance in this area.
3. Kinetic Depth Effect.
Rotation of the object, combined with hidden-line removal gives a very realistic effect. It is probably the best representation, but can only be produced at a special-purpose graphics workstation since it requires considerable computing power to carry out the hidden-line calculations in real time.
4. Perspective Projections.
If we have some means of knowing the relative size of the objects, then the fact that the perspective transformation makes the closer objects appear larger will give a good effect of depth. If the objects are easily recognised then knowledge about their relative sizes (e.g. a hill is usually larger than a house or a tree) will be interpreted as information about their distance from the viewer. It is only when we have a number of objects, such as cubes or spheres, which are completely separate in space and we have no information on their relative size, that the perspective transformation cannot be interpreted by the viewer in this way.
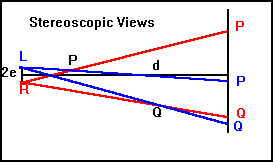
5. Stereographic Projection.
In this case, we have two perspective projections, one for each eye. We need some method of ensuring that each eye sees only its own view and then we can rely on the human brain to merge the views together and let us see a three-dimensional object.
One method is to produce separate views at the correct distance and scale for use with a stereographic viewer. This allows for black-and-white or colour drawings to be seen in their true colour.
The other method is necessarily polychrome. It requires two perspective projections, one from each eye position. Let us assume the view for the left eye is drawn in one colour (e.g.blue) and the view for the right eye is drawn in another colour (e.g. red).
Each eye must see only its own view. So if the view from the left eye is drawn in blue, and the right eye views the drawings through a blue filter then the blue lines will be invisible to the right eye since they will blend into the white background when viewed through a blue filter.
Similarly if the drawing for the right eye is in red, and the left eye has a filter of the same colour, then the drawing for the right eye will be invisible to the left eye.
In the figure, the eyes are assumed to be distance 2e apart (usually about 3 inches) and the plane onto which the pictures are projected is distance d from the eyes (frequently 12 to 15 inches). So for the left eye, we need to move the axes a distance e in the x-direction and then project onto the plane, and finally shift the drawing back again. Thus the projection for the left eye means that the point (x,y,z) becomes the point ((x+e)*d/z - e, y*d/z, 0).
For the right eye, the axes must be moved a distance -e and then the point (x,y,z) is projected onto the plane and becomes ((x-e)*d/z + e, y*d/z , 0)
When this has been done for all the vertices, they are joined up and the object is drawn in the appropriate colours.